Well we made it back from our busiest week ever! It started out with my sister's wedding-which was absolutely beautiful and so much fun. I know they will be very happy but together but it was hard to see my little sister look so grown up. After that, we were off to Reno, NV for one of Mike's weed science meetings. We took in the latest research in weed science, good times with old & new friends, a little bit of gambling, and a brutal virus.
It hit me on Wednesday like a ton of bricks. I have never had a cold/flu with such terrible body aches before. Thursday was the day we traveled home and I almost had a meltdown in the Minneapolis airport. As usual for that airport, our arrival gate was the furthest it could possibly be away from our departure gate. So endlessly onward we trudged, carry-on's in tow, coughing, every muscle in my body aching, head throbbing every step of the way. My eyes and throat burned, and I wanted nothing more than to be at home in my bed. If my superhero husband took had not taken care of me and led me to the gate I probably would have sat down somewhere, had an adolescent tantrum, and refused to move in my ill state.
We did finally make it home and the next day it hit him. He called in sick to work and we both went into the doctor and did the whole flu testing routine which came back all negative. Doc determined it was probably viral and gave us some stuff to help with the body aches. We returned to the farm on a self-proclaimed quarantine. Today I felt much better so luckily it seems short lived.
Did I mention it was a beautiful day to be quarantined? It was unseasonably warm, the birds were singing, and the sun was shining. I peeled the winter shrink wrap off the windows, washed and put the screens in, and opened up the house. All of us (including the cat) were enjoying some fresh air for a change. Mike did a little bit more pruning on the lilacs but he still feeling sick so lets all hope he feels better soon!
Saturday, March 17, 2012
Saturday, March 3, 2012
Western Wedding Garters
My little sister's wedding is coming up in less than a week! I was lucky enough to be asked to make some of the accessories for the wedding, including the garters. They are kind of a fun project that can be made very elaborate if you are a fussy stitcher or very simple if you are into quick & dirty sewing. The key is to make them flat; put in the elastic and join the ends last. Work with strips-press and topstitch rather than trying to work with tubes.

This is the "keeper". The top is brown lace layered over turquoise satin with a satin ribbon peaking out the top. If you are layering two fabrics like this, I recommend basting the two pieces together before joining them with anything else. To do the ribbon at the top baste the ribbon to the front fabric right sides together before stitching the backing fabric on. Basting each layer takes extra time but is totally worth it. Also, good pressing is essential but be careful with these fancy fabrics! They melt easily and satin will often leave press marks. To mitigate press marks use a press cloth, trim seams neatly, and iron lightly. I use my sleeve roll frequently when pressing on satin. The round shape allows you to press only where the seam or edge is and your seam allowances fall away.
The bottom is fringe layered over a brown satin ruffle with decorative stitching. I used a fusible interfacing for reinforcement on the satin before doing the decorative stitching. Again, baste the fringe into place before putting it all together. The garter is finished with some bling and a ribbon bow with an applique of their initials stitched onto the ends. I do not have an embroidery machine, but my Janome 4900MC can do some nice stitches and lettering.
Here is the "throwing" garter that I made a little more simple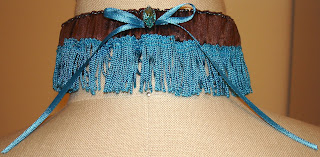 . It has the brown satin on top with the turquoise fringe and a bow with a rhinestone. I believe I did approximately a double length for the gather on both pieces. Use a bodkin or large safety pin to pull the elastic through. Be sure to pin the elastic and try it on before you stitch it together. It is supposed to sit a few inches above the knee.
My garters will soon be making their appearance-best of luck with yours!

This is the "keeper". The top is brown lace layered over turquoise satin with a satin ribbon peaking out the top. If you are layering two fabrics like this, I recommend basting the two pieces together before joining them with anything else. To do the ribbon at the top baste the ribbon to the front fabric right sides together before stitching the backing fabric on. Basting each layer takes extra time but is totally worth it. Also, good pressing is essential but be careful with these fancy fabrics! They melt easily and satin will often leave press marks. To mitigate press marks use a press cloth, trim seams neatly, and iron lightly. I use my sleeve roll frequently when pressing on satin. The round shape allows you to press only where the seam or edge is and your seam allowances fall away.
The bottom is fringe layered over a brown satin ruffle with decorative stitching. I used a fusible interfacing for reinforcement on the satin before doing the decorative stitching. Again, baste the fringe into place before putting it all together. The garter is finished with some bling and a ribbon bow with an applique of their initials stitched onto the ends. I do not have an embroidery machine, but my Janome 4900MC can do some nice stitches and lettering.
Here is the "throwing" garter that I made a little more simple
 . It has the brown satin on top with the turquoise fringe and a bow with a rhinestone. I believe I did approximately a double length for the gather on both pieces. Use a bodkin or large safety pin to pull the elastic through. Be sure to pin the elastic and try it on before you stitch it together. It is supposed to sit a few inches above the knee.
My garters will soon be making their appearance-best of luck with yours!
Friday, February 24, 2012
Ode to the Barn Cats
Growing up on a ranch, most conversations in our house revolved around animals. Whether about cattle, pets, or wildlife we could talk about animals for hours. So I will embrace my inner crazy animal lady and introduce some of the critters here on our farm. The barn cats have only been here about a month but they made it feel more like a farm.
Skitty kitty is the mama barn cat. She likes people but get a little scared if you try to approach her. She hangs around the house some days but is often gone-I assume out hunting. She is playful and will chase the dog around the yard.
Tatanka is one of her kittens. She is very friendly, loves attention. She is a bit "fluffy" if you know what I mean, maybe from all the mice she's been eating.
There is another grey tabby kitten that is pretty wild. So wild I have no picture of it. It disappeared shortly after it was dropped off here and I thought it either ran away or got eaten by something. Lately however, I was glad to see it showed up again.
I think these cats are probably all good hunters and are relatively good at avoiding predators. Since we got them, there is evidence of a skunk hanging around. I think he comes into the shop at night where their food and beds are and eats their food. Such is the hard knock life of a barn cat; fighting the skunk for your food while trying to not become food for a fox, owl, or eagle. They are happy though and we are grateful for the job they do.
Skitty kitty is the
 mama barn cat. She likes people but get a little scared if you try to approach her. She hangs around the house some days but is often gone-I assume out hunting. She is playful and will chase the dog around the yard.
Tatanka is one of her kittens. She is very friendly, loves attention. She is a bit "fluffy" if you know what I mean, maybe from all the mice she's been eating.
There is another grey tabby kitten that is pretty wild. So wild I have no picture of it. It disappeared shortly after it was dropped off here and I thought it either ran away or got eaten by something. Lately however, I was glad to see it showed up again.
I think these cats are probably all good hunters and are relatively good at avoiding predators. Since we got them, there is evidence of a skunk hanging around. I think he comes into the shop at night where their food and beds are and eats their food. Such is the hard knock life of a barn cat; fighting the skunk for your food while trying to not become food for a fox, owl, or eagle. They are happy though and we are grateful for the job they do.
Thursday, February 23, 2012
Door Chime Makeover

I have not written too much yet on my diy home adventures. I guess I was trying to wait until something was "finished" to write about it. That nasty "F" word anyway. So here is a little project that is actually finished...
This beauty, our 1970's fake wood grain and brass door chime was ready for an update. It still worked so I didn't want to trash it completely but it definitely needed an update. I decided to go with a black/silver scheme to match my stainless steel appliances.
First, I figured out which breaker runs the door chime and turned it off. The front plate pulls off pretty easily and the rest is wired in and hung on a screw. It was full of cobwebs so once I got it down I cleaned it up. The pipes unscrew from the main piece and then the chimes could be pulled off. There were little rubber washers that held the chimes onto the pipes so I was careful not to loose them.
I taped off the motif on the front plate and that was ready to paint. I spray painted the pipes and the motif with silver spray paint-2 coats. Then I painted over the wood grain
 with an acrylic enamel. I had never used this kind of paint before-it is very shiny and you really have to keep a wet edge or it shows. It dries very hard and looks kind of plasticky. I did 2 coats of this as well.
After it was all dry I put it back together and hooked it up. The spray paint was scratching off pretty easily but now that it is up there it won't be touched. It was a cheap update and looks way better-on to the next project!
Sunday, February 19, 2012
Its dendricide!
 Ever since we moved here Mike's been itching to slice and dice our overgrown lilac bushes. This scares me because being a weed scientist, he is very good at killing plants and these are ones I want to keep! I love lilacs because they remind me of our wedding and when we looked at this place I was very excited about the lilacs lining the north and west corner of the house. I don't want to take any chances with them. However, the plant scientists in my life tell me it is actually good to prune them this time of year when there are fewer pests around. With this beautifully warm un-winter we are having Saturday was a good day for yard work and I finally gave him the go ahead.
He used a pruning saw to cut off the old, overgrown, and dead branches of one of the bushes and left the newer shoots. We probably won't get flowers on that one for awhile, but this one was especially out of control. He left plenty of other bushes untouched so we will still have lilacs blooming this spring.

While we were at it, we also decided to cut down the poopy tree behind the house. Its not actually covered in poop it has a fungus call black knot. Turns out it is treatable but we thought the tree was pretty infested and as I mentioned earlier, Mike is a proponent of plant slaughter.
Now we have some good bonfire material.

Tuesday, February 14, 2012
Down home beef stew and it's sidekick-the pot pie

Nothing says country cooking like beef stew. I made a couple gallons of it this weekend for my Mom's 50th birthday party with my parent's beef so I thought I'd share my recipe. It is so easy in the slow cooker-and very tasty! As a bonus, the leftovers make a great pot pie.
Beef Stew
olive or canola oil
4 med. onions, chopped
small can tomato pate
3 t or ~ 6 cloves minced garlic
salt
14 oz can low sodium chicken broth
14 oz can low sodium beef broth
~4 lbs beef stew meat
1/3 c soy sauce
2 T dry tapioca
2 bay leaves
1 1/2 lbs red potatoes, cut into chunks
1 lb baby carrots
1 t thyme
2 c frozen peas
pepper
Heat some oil in a skillet and add the onions, tomato paste, garlic, and salt to taste. Cook until onions are softened and lightly browned 10-15 min. Stir in some broth, scraping up browned bits. Put in a slow cooker with the meat, broth, soy sauce, tapioca, and bay leaves.
Toss the potatoes & carrots with some oil and the tyme and season with salt & pepper. Wrap in a foil packet and place on top of the rest in the slow cooker. Cover and cook on low until the meat is tender 9-11 hours.
Remove foil packet and skim off fat. Remove bay leaves. Dump the contents of the foil into the stew and add peas. Let stand about 5 minutes.
Beef Pot Pie
Roll out a frozen pie crust or make your own. Place leftover beef stew into shell and cover with top dough. Brush with beaten egg mixed with water. Bake at 375 until golden brown.
Wednesday, February 8, 2012
Cooperative Meeting
Mike and I went to our first electric coop annual meeting last night. Our neighbor was running for the board, so we came to support him. He won by only two votes, so we were glad we went and felt like our vote really mattered. I think that is one of the best things about the cooperative business model-as a member you have a hand in the decision making.
Making a difference in the community is something we missed as people with rural roots living in the big city. You are a part of the community just like you are a part of a cooperative-in some ways its an obligation but you want to be a part of it. Your contribution, however humble, matters in a small community.
Besides all that good stuff, the meeting was interesting. If I remember correctly the four cheapest ways to make electricity are hydro, natural gas, coal and wind; all of which we have here in North Dakota. It was also cool to learn that a good chunk of the power from our coop comes from renewable sources. Also, we learned that rural electric coops started with the help of President Roosevelt. The meeting was good food for thought-we talked about energy all the way home.
Subscribe to:
Posts (Atom)