Well we made it back from our busiest week ever! It started out with my sister's wedding-which was absolutely beautiful and so much fun. I know they will be very happy but together but it was hard to see my little sister look so grown up. After that, we were off to Reno, NV for one of Mike's weed science meetings. We took in the latest research in weed science, good times with old & new friends, a little bit of gambling, and a brutal virus.
It hit me on Wednesday like a ton of bricks. I have never had a cold/flu with such terrible body aches before. Thursday was the day we traveled home and I almost had a meltdown in the Minneapolis airport. As usual for that airport, our arrival gate was the furthest it could possibly be away from our departure gate. So endlessly onward we trudged, carry-on's in tow, coughing, every muscle in my body aching, head throbbing every step of the way. My eyes and throat burned, and I wanted nothing more than to be at home in my bed. If my superhero husband took had not taken care of me and led me to the gate I probably would have sat down somewhere, had an adolescent tantrum, and refused to move in my ill state.
We did finally make it home and the next day it hit him. He called in sick to work and we both went into the doctor and did the whole flu testing routine which came back all negative. Doc determined it was probably viral and gave us some stuff to help with the body aches. We returned to the farm on a self-proclaimed quarantine. Today I felt much better so luckily it seems short lived.
Did I mention it was a beautiful day to be quarantined? It was unseasonably warm, the birds were singing, and the sun was shining. I peeled the winter shrink wrap off the windows, washed and put the screens in, and opened up the house. All of us (including the cat) were enjoying some fresh air for a change. Mike did a little bit more pruning on the lilacs but he still feeling sick so lets all hope he feels better soon!
Saturday, March 17, 2012
Saturday, March 3, 2012
Western Wedding Garters
My little sister's wedding is coming up in less than a week! I was lucky enough to be asked to make some of the accessories for the wedding, including the garters. They are kind of a fun project that can be made very elaborate if you are a fussy stitcher or very simple if you are into quick & dirty sewing. The key is to make them flat; put in the elastic and join the ends last. Work with strips-press and topstitch rather than trying to work with tubes.

This is the "keeper". The top is brown lace layered over turquoise satin with a satin ribbon peaking out the top. If you are layering two fabrics like this, I recommend basting the two pieces together before joining them with anything else. To do the ribbon at the top baste the ribbon to the front fabric right sides together before stitching the backing fabric on. Basting each layer takes extra time but is totally worth it. Also, good pressing is essential but be careful with these fancy fabrics! They melt easily and satin will often leave press marks. To mitigate press marks use a press cloth, trim seams neatly, and iron lightly. I use my sleeve roll frequently when pressing on satin. The round shape allows you to press only where the seam or edge is and your seam allowances fall away.
The bottom is fringe layered over a brown satin ruffle with decorative stitching. I used a fusible interfacing for reinforcement on the satin before doing the decorative stitching. Again, baste the fringe into place before putting it all together. The garter is finished with some bling and a ribbon bow with an applique of their initials stitched onto the ends. I do not have an embroidery machine, but my Janome 4900MC can do some nice stitches and lettering.
Here is the "throwing" garter that I made a little more simple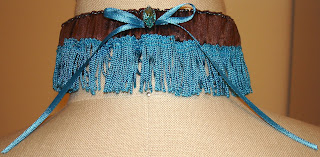 . It has the brown satin on top with the turquoise fringe and a bow with a rhinestone. I believe I did approximately a double length for the gather on both pieces. Use a bodkin or large safety pin to pull the elastic through. Be sure to pin the elastic and try it on before you stitch it together. It is supposed to sit a few inches above the knee.
My garters will soon be making their appearance-best of luck with yours!

This is the "keeper". The top is brown lace layered over turquoise satin with a satin ribbon peaking out the top. If you are layering two fabrics like this, I recommend basting the two pieces together before joining them with anything else. To do the ribbon at the top baste the ribbon to the front fabric right sides together before stitching the backing fabric on. Basting each layer takes extra time but is totally worth it. Also, good pressing is essential but be careful with these fancy fabrics! They melt easily and satin will often leave press marks. To mitigate press marks use a press cloth, trim seams neatly, and iron lightly. I use my sleeve roll frequently when pressing on satin. The round shape allows you to press only where the seam or edge is and your seam allowances fall away.
The bottom is fringe layered over a brown satin ruffle with decorative stitching. I used a fusible interfacing for reinforcement on the satin before doing the decorative stitching. Again, baste the fringe into place before putting it all together. The garter is finished with some bling and a ribbon bow with an applique of their initials stitched onto the ends. I do not have an embroidery machine, but my Janome 4900MC can do some nice stitches and lettering.
Here is the "throwing" garter that I made a little more simple
 . It has the brown satin on top with the turquoise fringe and a bow with a rhinestone. I believe I did approximately a double length for the gather on both pieces. Use a bodkin or large safety pin to pull the elastic through. Be sure to pin the elastic and try it on before you stitch it together. It is supposed to sit a few inches above the knee.
My garters will soon be making their appearance-best of luck with yours!
Subscribe to:
Posts (Atom)